|
Why do we have pages about the vehicles we use to travel W.A. on this website? Mainly to provide useful information about the
different ways to travel this huge state and hopefully to share useful tips and tricks we discover about travelling.
We have had the Coaster motorhome for a while now but there are plenty of places 5 tons of
2wd vehicle just won't go.
On the 'bucket list' is a trip to Shark Bay and camping by the beach while we take a tinny offshore to catch some pinkies.
Can you beleive I have NEVER caught and adult pinky?!
Well we went out and bought a camper trailer to tow behind the 4x4. That should give us the ability to get to a bunch more places
and experience a lot more than we can with the Coaster.
This page will be all about the Camper Trailer and our experiences, modifications and inevitable failures as we take it into the
outback and along the coast.
The trailers were originally built in Melbourne and from what we can tell, were all Australian made with Australian steel.
That makes a big difference when you start looking at the cheap imports that are around today. The new stuff might look pretty
and offer all the bells and whistles, but most of them are just not built tough enough for the Aussie outback.
Our trailer dates from 2008 and still scrubs up pretty well. We did have to do a bit of cleaning up and touch up a bit of paint here and
there, but after a couple of days work, it all looked pretty good.
While I was looking for information on the camper I found that the company that made it was no longer in operation but
there was a copy of their website on the Wayback Machine. (This is an archive of websites that have been on the internet.)
So to start with here are the specifications we found relating to our trailer.
Features:
Off road coupling, Standard spare wheel, Rims 15"x 8" csa Ranger White 6 Stud, Tyres Federal A/T 39.5-15 (750mm x 250mm),
Springs (rated @ 950kg ea) independant suspension, Shockers (Pedders), suspension rubber stoppers, Jerry can holder,
Jockey wheel 8" (Locking swing type), Gas bottle holders inc 2x 4.5kg gas bottles, Side lift gas struts, Fold-out kitchen on rear door
inc. cupboards, Gas fittings, Tee piece gas valve, Two burner stove Lido Junior with grill, Stainless Steel sink (smev),
Water filler point x2 (lockable), Water tank (60 ltr) x 2, Tee level Indicator, Side Step, Powder Coated Kitchen,
Galvinising, 27" jacks (pair) and handle storage, Rear tow point (for bike rack, etc), LED Tail Lights, Electric pump,
Hand brake, 12" Electric brakes, Hot and Cold taps, Front Toolbox complete (tapered), Battery box, 12 V 3-way power socket,
Deep cycle battery, Water heater, Shower unit, 240 volt 1200 W inverter, Solar panels and Charger (20 Watt 12 V),
,Stone guard, Complete Annex, Suzuki 6hp 4 stroke outboard engine, Quintrex 245 Explorer dinghy and a boat rack.
Without the outboard and dinghy, this package originally cost $17,825 in 2008.
The first thing for us to learn was how to set up the tent top so despite the limited space, we pulled it up into the back garden
and started working out how everything went together.

Step 1 : Swing the boat down.

Step 2 : Remove the waterproof cover.

Step 3 : Put up the main tent.

Step 4 : Swing the kitchen out.

Step 5 : Setup the inside.


Step 6 : Put the awning roof up. There wasn't much room so we left the walls off.
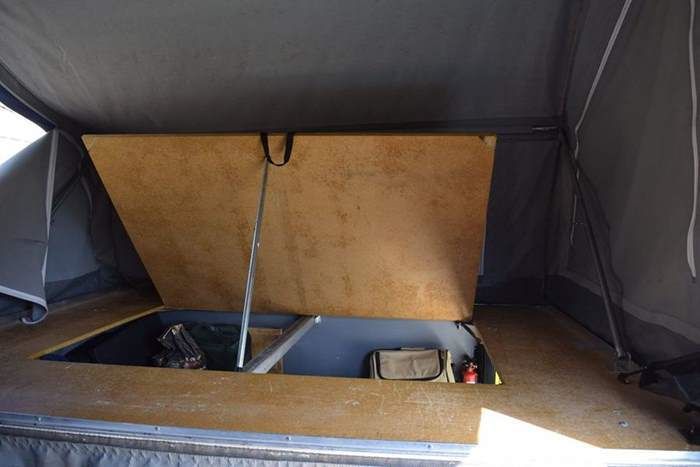
The first modification was very simple but very useful. It just involved drilling a hole in the bed base and getting
half a tent pole to support the heavy wooden base once it was lifted up. I have seen a later model where two gas struts
have been addeed to make this job much simpler but our trailer was an earlier model and hadn't had the upgrade installed.
The half tent pole does the job perfectly so it was simple, quick and didn't cost a cent!

Modification No. 1
The next job was to get a new solar system. The original panels are way too small but will be convenient for just keeping the
batteries charged when not in use.
We picked up a great system from Offroad Living that includes
a water proof / dust proof MPPT solar controller, 2 x 120 ah AGM Fullriver batteries and an Allspark 130 watt solar blanket.
This should provide enough power for the lights, water pump and the 60 litre Engel fridge that we will be using.

Solar system from Offroad Living
As we start to use the camper and modify things, we will post all the info and pictures here, so drop back from time to time to see
what we have been up to. It shouldn't be too long before the first update as we are due to go away within the next couple of weeks.

Modification No. 2
So far our modifications are very simple but quite useful. This mod simply puts a tent pole support at the end of the swing out kitchen in order to give it
better support.
In addition to that, some screws were put along the edge of the wooden extension in order to hang up the kitchen utensils.
We have put together a packing list for the 4x4 and camper trailer that we use for our own trips. Hopefully, if you have a similar set up,
you might find the list helpful.
4x4 and Camper Trailer packing list.
|


